# 一、发布订阅模式原理

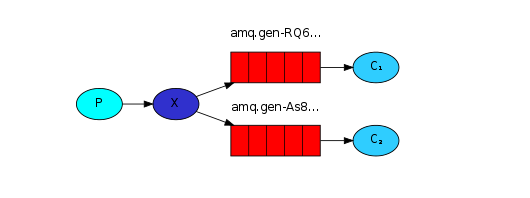
在开发过程中,有一些消息需要不同消费者进行不同的处理,如电商网站的同一条促销信息需要短信发送、邮件发送、站内信发送等。此时可以使用发布订阅模式(Publish/Subscribe),其工作原理如下:
- 生产者将消息发送给交换机,交换机将消息转发到绑定此交换机的 每个队列 中。
- 工作队列模式的交换机只能将消息发送给一个队列,发布订阅模式的交换机能将消息发送给多个队列。
- 发布订阅模式使用 fanout 交换机。
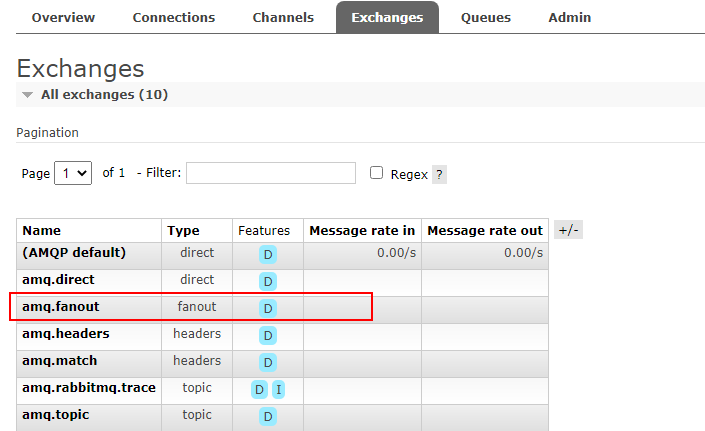
Fanout这种类型非常简单。它是将接收到的所有消息广播到它知道的所有队列中。在系统中可以查看到默认的一些exchange类型,其中就包括fanout类型交换机。
# 二、发布订阅模式实战
# 1、消费者代码
在发布订阅模式下,需要使用fanout类型的交换机,可以选择通过channel.exchangeDeclare()创建,指定类型为fanout,并且需要将交换机与队列进行绑定,形成绑定关系,这样生产者在发送消息到交换机以后,fanout交换机才会把该消息广播发送到各个具有绑定关系的队列。
消费者01代码如下:
/**
 * Description: 发布订阅模式消费者01
 */
public class ReceiveLogs01 {
    //设置要创建的交换机的名称
    private static final String EXCHANGE_NAME = "logs";

    public static void main(String[] args) throws Exception {
        Channel channel = RabbitMqUtil.getChannel();
    	//创建fanout交换机
        /**
         * 参数1:交换机名
         * 参数2:交换机类型
         * 参数3:交换机是否持久化
         */
        channel.exchangeDeclare(EXCHANGE_NAME, "fanout", false);
    	/**
        * 生成一个临时的队列 队列的名称是随机的
        * 当消费者断开和该队列的连接时,队列自动删除,防止无用队列占用空间
        */
        String queueName = channel.queueDeclare().getQueue();
    	//将交换机与队列进行绑定(binding)
        /**
         * 参数1:队列名
         * 参数2:交换机名
         * 参数3:路由关键字,发布订阅模式写""空串即可
         */
        channel.queueBind(queueName, EXCHANGE_NAME, "");
        System.out.println("等待接收消息,把接收到的消息打印在屏幕上......");
    	//接收消息
        channel.basicConsume(queueName, true, new DefaultConsumer(channel) {
            @Override
            public void handleDelivery(String consumerTag, Envelope envelope, AMQP.BasicProperties properties, byte[] body) throws IOException {
                String message = new String(body, "UTF-8");
                System.out.println("ReceiveLogs01控制台打印接收到的消息: " + message);
            }
        });
    }
}
1
2
3
4
5
6
7
8
9
10
11
12
13
14
15
16
17
18
19
20
21
22
23
24
25
26
27
28
29
30
31
32
33
34
35
36
37
38
39
2
3
4
5
6
7
8
9
10
11
12
13
14
15
16
17
18
19
20
21
22
23
24
25
26
27
28
29
30
31
32
33
34
35
36
37
38
39
消费者02代码如下:
/**
 * Description: 发布订阅模式消费者02
 */
public class ReceiveLogs02 {
    //设置要创建的交换机的名称
    private static final String EXCHANGE_NAME = "logs";

    public static void main(String[] args) throws Exception {
        Channel channel = RabbitMqUtil.getChannel();

        channel.exchangeDeclare(EXCHANGE_NAME, "fanout", false);

        String queueName = channel.queueDeclare().getQueue();

        channel.queueBind(queueName, EXCHANGE_NAME, "");
        System.out.println("等待接收消息,把接收到的消息打印在屏幕上......");
    	//接收消息
        channel.basicConsume(queueName, true, new DefaultConsumer(channel) {
            @Override
            public void handleDelivery(String consumerTag, Envelope envelope, AMQP.BasicProperties properties, byte[] body) throws IOException {
                String message = new String(body, "UTF-8");
                System.out.println("ReceiveLogs02控制台打印接收到的消息: " + message);
            }
        });
    }
}
1
2
3
4
5
6
7
8
9
10
11
12
13
14
15
16
17
18
19
20
21
22
23
24
25
26
2
3
4
5
6
7
8
9
10
11
12
13
14
15
16
17
18
19
20
21
22
23
24
25
26
# 2、生产者代码
由于在消费者中已经完成交换机声明,队列创建及二者之间的绑定关系,因此生产者部分的代码较为简单,只需要在发送消息时指定好前面创建的交换机名称即可。
/**
 * Description: 发布订阅模式生产者
 */
public class EmitLog {
    //交换机名称
    private static final String EXCHANGE_NAME = "logs";

    public static void main(String[] args) throws Exception {
        Channel channel = RabbitMqUtil.getChannel();

        //发送消息
        Scanner scanner = new Scanner(System.in);
        while (scanner.hasNext()) {
            String message = sc.nextLine();

            //参数1:指定交换机名称
            //参数2:指定routingkey,发布订阅模式写""空串即可
            channel.basicPublish(EXCHANGE_NAME, "", null, message.getBytes("UTF-8"));
            System.out.println("生产者发出消息" + message);
        }
        //关闭资源
        channel.close();
    }
}
1
2
3
4
5
6
7
8
9
10
11
12
13
14
15
16
17
18
19
20
21
22
23
24
2
3
4
5
6
7
8
9
10
11
12
13
14
15
16
17
18
19
20
21
22
23
24
# 3、查看运行结果
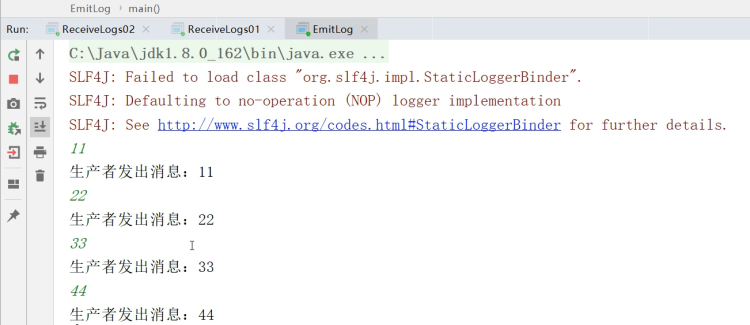
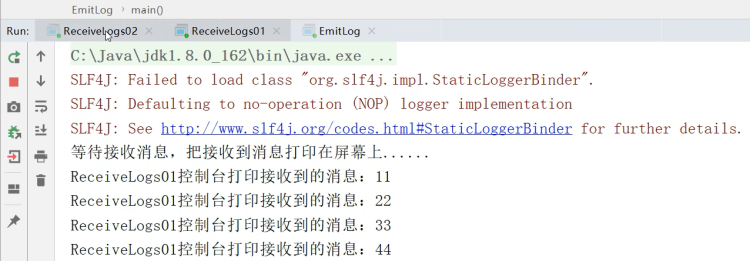
将ReceiveLogs01和ReceiveLogs02启动,等待接收消息,再启动生产者,通过控制台发送消息。
消息发送完毕以后,查看两个消费者都接收到了同样的消息,类似广播,而非之前的互斥接收。
